How to use a Jade Gua Sha Massage Tool
How to Use a Gua Sha Tool
If you’ve been looking for a tool that will change your whole beauty routine, look no further than the Jade Gua Sha Massage Tool from The Sage Owl.
Experience Yang Sheng -The Art of Chinese Self-Healing - with every use.
Being beautiful means having healthy skin. Achieve that healthy skin with a tool that has been in use for hundreds of years, the Gua Sha skincare tool.
Follow the steps below to get the most out of your Guasha tool!
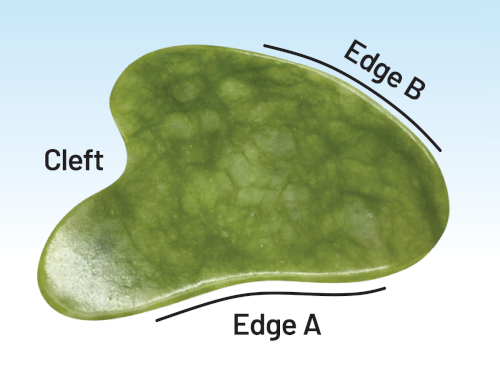
The Gua Sha tool has a specific shape to help it fit the contours of your body. We have labeled 3 parts to help describe the proper use easier. The 3 parts are Edge A, Edge B, and the Cleft.
Edge A is the inward curved (concave) portion. It is used on any portion of the body with a slight bulge outwards, like the cheeks.
Edge B is the outward curved (convex) portion. It is used on any portion of the body with thicker flesh, like the biceps, stomach, and leg muscles.
The cleft is the sharply inward curved (concave) portion between the two points. It is used on any portion of the body with a protrusion, like the eyebrows, jawbone, and spine.
Remember these parts as you follow the directions below.
Back of The Neck
Place the Cleft of the Gua Sha on the base of the neck. Using firm pressure, pull the Gua Sha up to the hairline.
Apply additional pressure on the spots that feel stiffer as you pull the Gua Sha tool up. Repeat several times.
The Neck
Place Edge A just above the collarbone. Pull the Jade Gua Sha Facial Tool up, towards the jaw.
Use a short "sawing" movement near the jaw to help firm up the loose skin and muscles in that area.
Repeat several times, and then do the same to the other side of the neck.
The Throat
Place the Cleft on the base of your throat, between the collarbones. Pull the Gua Sha Tool up towards the chin, following the natural curvature of the neck.
Use gentle pressure on the neck and finish by applying some pressure on the chin area using a short "sawing" motion with the two tops of the Cleft.
Repeat several times.
The Jaw
Use your free hand to hold the tip of the chin, keeping the skin tight. Place the Cleft on your jawbone. Align it with the short tip at the cheek area and the longer tip at the neck area.
Pull the Gua Sha Tool towards the base of the ear, using the jawline as the path. Some pressure can be applied to the base of the ear.
Repeat several times, and then do the same to the other side of the jaw.
The Cheeks
Use your free hand to pull on the skin from the side of the nose and upper lip, keeping it tight. Place Edge A on your cheek alongside the nose. Align it with longer tip just under the eyes.
Pull towards the side of the head, following the cheekbones, up to the hairline. Use medium pressure.
Repeat several times, and then do the same to the other cheek.
The Eyes
Use your free hand to gently pinch the bridge of your nose, pull the skin a bit. Place the Cleft under your eye. Align it with the short tip at the outer edge of the eye and the longer tip at the inner edge of the eye. The cleft will be under the pupil of your eye.
Pull it along the base of your eye and upwards to the temples, following the curvature of your face. Use gentle pressure around the eyes.
Repeat several times, and then do the same to the other eye.
The Eyebrows
Use your free hand to hold the skin between your eyebrows. Place the Cleft on your eyebrow. Align it with the short tip under the eyebrow and the longer tip above the eyebrow.
Pull towards the hairline, following the curvature of the eyebrows. Use gentle pressure around the eyes.
Repeat several times, and then do the same to the other eyebrow.
The Forehead
Use your free hand to hold the eyebrow and prevent it from raising. Place Side A along the top of the eyebrow.
Pull up to the hairline using gentle pressure.
Repeat several times, and then do the same to the other eyebrow.
The Rest of Your Body
Using the techniques described above, you can use your Gua Sha tool on nearly every part of your body - sore muscles, lackluster skin tone, anywhere you feel stuck energetically, etc.
From the bottom of your feet to your calf muscles to your upper legs to your stomach to your back to your arms - anywhere there is skin and muscles is fair game.
Works great as an acupressure tool and reflexology tool as well!
Remember to use firm pressure over your muscles and light pressure where the bones are close to the surface.
Tips
- Always use light but firm pressure. Remember that this is supposed to be a relaxing experience. If you feel any sort of pain, that means you are using too much pressure, which can lead to bruising.
- Use your free hand to support the area you are working on and tilt your Gua Sha Tool at a 15-degree angle. This ensures proper skin contact, taking advantage of all of the Jade Gua Sha's crystal properties.
- After every use, wipe your Gua Sha Massage Tool with a clean piece of cloth. Microfiber cloths work well. You can also use a soapy, moist cloth. Pat-dry or air dry before storing it. For a deep clean, wash the Gua Sha in a bowl of warm water, along with light hand soap or facial soap. The Gua Sha is not safe to use with a dishwasher or washing machine as they may chip or break the Jade.
- If your Gua Sha squeaks or drags on your skin, apply a drop or two of oil. You can use face mist, facial moisturizer, or facial serum with your Gua Sha. This reduces friction with your skin and Gua Sha and helps with the efficiency of nutrient absorption from your facial products.
- To prevent damage to your facial massage tool when traveling, carry your Gua Sha in its box or wrap it in soft fabric.
- For a more refreshing feel, refrigerate your Jade Gua Sha until it's cool to the touch before using. Pro Tip: Place the Gua Sha tool in a zip lock bag or air-tight container, so it does not smell like last night's leftovers.
- Avoid dropping your Jade Gua Sha. Even though it's made of solid crystal, real Jade can crack or break.
Learn more about our Products:
Amazon: https://www.amazon.com/thesageowl
Facebook: https://www.facebook.com/The.Sage.Owl.LLC
Instagram: https://www.instagram.com/the_sage_owl_llc
Contact Us with any Questions:
You can contact us via Facebook Messenger or the form below.
- We typically reply within an hour during normal business hours
- Monday thru Friday, 8 am to 5 pm Central Time, except Holidays